Tips on Teaching a Child to Sew by Doll Clothing Designer Chelly Wood
 I often get questions from my website followers about how to teach a child to sew, and these are a few tips I’ve learned from not only teaching my own children to sew, but also from teaching children how to sew at the school library where I work at my “day job.”
First, it’s important to wait to start the first sewing lesson until the child is old enough to write using pencils and cut with scissors because similar fine-motor skills will be needed for sewing projects. I recommend beginning with a needle and thread rather than a sewing machine. I also suggest starting with felt a fabric that’s both flexible and easy for children to hold along with a pointed-tip yarn-sized needle that’s not too scary. With older kids (ages 9 and up), start them with a pointed-tip embroidery needle.
These larger needles are easy for a young child to thread, but the yarn needles are also safer for very young children, as they’re less likely to poke themselves (which might frighten them into giving up on sewing before they get very far). It’s best to pre-thread half a dozen needles for your child to work with, but at the start of each sewing session, encourage the child to use a needle threader to practice threading the needle just once before embarking upon the actual sewing activity.
It's also a good idea to use a contrasting color of thread for the child's first project. That way they can clearly see the thread's placement along the edge of the felt fabric. This will prevent their stitches from alternating between accidental whip stitches and straight stitches.
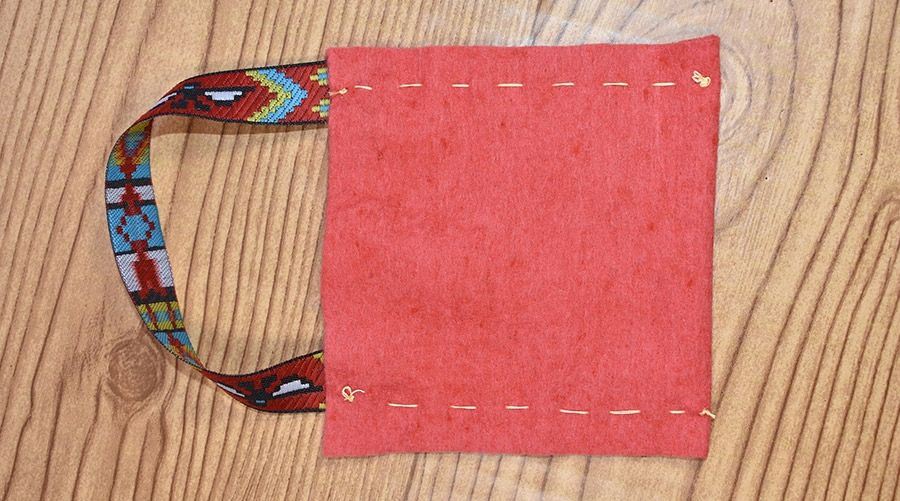
As far as projects go, a super-easy first project is to make a felt satchel with a ribbon strap. This can take the form of a sword sheath for a cardboard toy sword, a carry-all for holding a child’s smallest toys, a purse, or a baby doll’s diaper bag.
Cut a piece of felt that's 20 cm x 10 cm. Cut a length of ribbon that's 15 to 17 cm long. A satchel this small is easy for a child to finish in 30 minutes or so, and with younger children, it's important to keep the sewing time under 30 minutes, if possible. For very young children, don't expect them to stay interested for more than about 15 minutes, which means this could be a two-day project for them.
Have the child sew the satchel’s strap (a ribbon) to each corner along the top of a rectangle of felt (so the strap arches across the top of the swatch of felt) using a straight stitch. Expect their first stitches to be quite large, and that’s perfectly okay. Instead of trying to correct their wide stitches, just press on. Their stitches usually get smaller on their own, with practice.
Attaching the two ends of their satchel’s ribbon strap will give them practice with making knots using their needle and thread. For this part of the lesson, focus on the importance of keeping enough thread to form a loop for the needle to pass through when forming the knot. This is an important first lesson, but expect them to make mistakes.
When they do make the common mistake of not having enough thread to form a knot, simply cut their thread close to the eye of the needle and tie the knot like you would knot a shoestring. Be positive in the way you talk about this mistake by saying things like, “I sometimes make that mistake too, so I’ve had lots of practice fixing it.”
Next, have the child fold the felt in half like a birthday card. They will need to stitch along the sides of the “card” to close the edges of their satchel. For this first sewing project, don’t bother hiding their stitches by inverting the satchel. Just let them sew along the outside of their satchel and consider this good enough.
For older children (ages 9 and up), you may want to cut out a triangle to sew to the top of the felt at the very beginning of the project. This can later become a flap to close off the finished satchel. Older children can then learn how to attach a button or snaps to the satchel’s flap as part of the learning process.
One of the best tips I can give you, when it comes to teaching a child to sew is this: let him or her make mistakes without criticism. This makes them feel safer about the whole process of sewing. I also recommend that you always unpick major sewing errors for the child until they’ve been sewing for a year or so. By that time, they’ll want to try using the unpicking tool anyway because they’ll be curious about it.
For children ages 9 and older, I have a free pattern for making a MineCraft character cube on my website. Once they have made a satchel, this cube plush toy could be a little more challenging follow-up project.
A doll dress with a felt bodice is another good project for a second or third sewing lesson. The felt bodice won’t need to be hemmed (because it’s felt), and you can attach a cotton skirt, giving the child a chance to sew a straight line on the sewing machine when hemming the cotton skirt. Use ribbons for the bodice’s straps, which will harken back to the lessons learned in the original satchel project.
|
|